If you’ve ever poured a still mead, that beloved honey wine, and wished it had that happy little sparkle of sparkling mead, you’re not alone. Carbonate mead well and it drinks lighter, smells brighter, and somehow disappears from the glass faster. Funny how that happens.
The good news is you can do carbonated mead at home without fancy lab gear. The bad news is carbonation is also where people accidentally invent bottle grenades. So I’m going to keep this practical, clear, and safety-first.
What “carbonated” really means (volumes of CO2, without the headache)
When homebrewers talk about carbonation, we usually mean volumes of CO2. One “volume” is basically one liter of carbon dioxide dissolved in one liter of mead (at standard conditions). You don’t need to do math, you just need a target.
Here are easy targets that work well for most meads:
- Light sparkle: about 1.5 to 2.0 volumes (think “soft fizz”)
- Beer-like: about 2.2 to 2.7 volumes (most crowd-pleasing range)
- Champagne-level: 3.5+ volumes (fun, but demands the right bottles and gear)
Temperature is the sneaky part. Cold liquid holds more CO2. That’s why a warm bottle hisses like a snake but still pours flat, while a chilled bottle pours lively, especially if you had to de-gas measurements taken during the initial fermentation.
Rule of thumb I use:
- For kegging, chill first, then carbonate.
- For bottle conditioning, a secondary fermentation step in the overall fermentation process, base your priming on the warmest temperature the mead reached after fermentation (because that’s when the least CO2 was dissolved).
If you want a broader overview of the process and options, this guide is a solid companion: How to carbonate mead.
Bottle conditioning vs kegging: two paths to bubbles
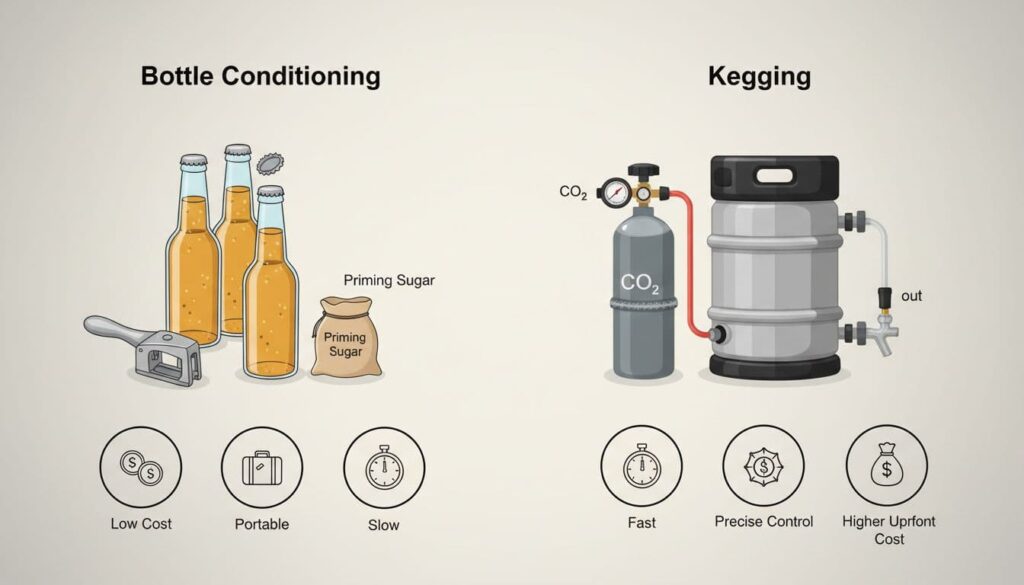
Both bottle conditioning and kegging work. They just solve different problems.
Quick comparison table
| Factor | Bottle conditioning | Kegging (force carbonation) |
|---|---|---|
| Upfront cost | Lower | Higher |
| Time to drink | Slower (usually 2 to 4 weeks) | Faster (often 2 to 7 days) |
| Control | Medium (depends on yeast, temp, time) | High (dial in exact carbonation) |
| Portability | Great (grab a few bottles) | Medium (keg setup is bulkier) |
| Works with stabilization (sorbate) | No | Yes |
| Sediment | Yes (a little yeast layer) | Minimal |
If you want a deep, practical look at bottle conditioning mechanics, I like this: Bottle Carbonation and Conditioning.
How to bottle condition mead safely (the slow, satisfying way)

Bottle conditioning is simple in concept: add a measured amount of sugar, cap it, let yeast make CO2 in the sealed bottle. The mead carbonates and also “rounds out” a bit with time.
My non-negotiable safety checklist (do this, keep your eyebrows)
- Confirm fermentation is finished: I wait for stable hydrometer readings (same gravity) over at least 3 days, and I prefer a full week if the mead was slow or stressed.
- Don’t prime a mead that’s still fermenting: that’s the classic bottle bomb origin story.
- Use a priming sugar calculator: especially if you’re aiming for a specific CO2 level or working with a 5-gallon batch. It accounts for batch size, temperature, and target volumes.
- Weigh priming sugar: measuring cups lie.
- Use proper bottles: no mystery glass from the recycling bin.
Bottle choice: what I trust (and what I side-eye)
- Best all-around: standard 12 oz crown-cap beer bottles (the pry-off kind) plus a bench capper.
- For higher carbonation (3+ volumes): champagne bottles with proper closures like wire cages (they’re built for pressure).
- Swing-top bottles: convenient, but quality varies. I only use thick, pressure-rated ones, and I keep carbonation modest. (For extreme pressure, stick to champagne bottles.)
Step-by-step: bottle conditioning without drama
- Cold crash (optional): A couple days cold helps drop yeast and haze. It also makes bottling cleaner.
- Sanitize everything: bottling bucket, siphon, wand, bottles, caps. Bubbles are fun, infections are not.
- Make priming solution: dissolve weighed priming sugar in a small amount of boiling water, cool it, add to a sanitized bottling bucket.
- Rack mead onto the priming solution: the swirl from racking mixes it gently. Avoid splashing.
- Fill and cap: leave normal headspace (a bottling wand makes this easy).
- Condition warm: I aim for 68 to 72°F (room temperature works well).
- Test a bottle: after 10 to 14 days, chill one for 24 hours and open it. If it’s close, great. If it’s flat, give it more time.
Realistic timelines (what I see at home)
- Carbonation build: 1 to 3 weeks
- Best flavor after carbonation: often 3 to 8 weeks total, depending on strength and ingredients
Big warning: stabilization and backsweetening change everything
If you stabilized with potassium sorbate (usually paired with sulfite), bottle conditioning is basically off the table. Sorbate stops yeast from multiplying, so carbonation may not happen, or it may act weird if you have stressed yeast. Either way, it’s not a reliable plan.
Also, if you backsweeten with honey or sugar and then bottle, you’ve added fermentables like residual sugar. Unless you’re using a non-fermentable sugar or doing an advanced, controlled process, that’s how bottles over-pressurize. High-gravity meads can be tricky too, since yeast may have hit its alcohol tolerance and stalled out. In those cases, restarting with a hardy strain like EC-1118 or champagne yeast can help ensure carbonation. For sweet sparkling mead, I keg.
Advanced note: For crystal clear bottled mead, explore riddling and degorging techniques after conditioning.
For more on best practices and the “why” behind bottle conditioning, the Homebrewers Association has a helpful guide: Mastering the art of bottle conditioning.
How to carbonate mead in a keg (fast, adjustable, great for sweet mead)

Kegging is my favorite way to force carbonate mead when I want control. It’s also the clean answer for sweet mead, because this method shines for sweetened versions. I can stabilize with potassium sorbate and potassium metabisulphite, backsweeten to taste, and carbonate with CO2 for carbonated mead, no risky refermentation in the bottle.
What I need for keg carbonation
- A Corny keg (pressure-rated)
- CO2 tank plus regulator
- Gas and liquid disconnects, beverage line, and a serving method (tap, picnic tap, kegerator)
If you want a detailed, reputable read on forced carbonation methods, this is worth your time: Forced Carbonation.
Two easy force-carb methods (no spreadsheet required)
Set-and-forget (my default)
Chill the keg to serving temp, then set the regulator to a steady pressure (often in the 10 to 15 PSI range, depending on how fizzy you want it and how cold the keg is). Wait 3 to 7 days. It’s boring, which is why it works.
Burst carb (when I’m impatient)
Chill the keg, then hit it with higher pressure for a short time, then drop to serving pressure. This can carbonate in 24 to 48 hours, but it’s easier to overshoot and end up with foam city.
Rule of thumb: colder keg, lower pressure needed for the same carbonation. Temperature drives everything.
What I choose (and what you should choose)
I pick bottle conditioning when:
- I want low-cost gear and easy sharing
- I’m okay waiting a few weeks
- I don’t mind a little sediment (a factor for those who prefer clarity)
- It’s dry mead (or sweetened only with non-fermentables)
I pick kegging when:
- I want fast, repeatable carbonation
- I’m making sparkling sweet mead
- I’ve stabilized with sorbate and sulfite
- I want to tweak carbonation like a volume knob
Conclusion: bubbles are optional, safety isn’t
When learning how to carbonate mead at home, I stick to two safe rules: fermentation must be truly finished before priming, and pressure belongs only in bottles or kegs designed for it. Bottle conditioning is slower and charming, kegging is faster and precise, and both can yield delicious carbonated mead.
Pick the method that fits your space, budget, and patience level, then commit to the process. If you want sweet and sparkling mead, I’ll say it plainly: kegging makes life easier.
Frequently Asked Questions About How to Carbonate Mead
Can you carbonate mead like beer?
Yes, you can carbonate mead, either with bottle conditioning (adding a measured amount of sugar and letting yeast make CO2 in the bottle) or forced carbonation (pushing CO2 into mead in a keg). Both work well, but they feel different.
What’s the biggest risk when you carbonate mead in bottles?
Bottle bombs. They usually happen when you carbonate mead before fermentation is truly done, or when you add too much priming sugar. Mead can finish slowly, so don’t trust airlock bubbles alone. Use stable gravity readings, measure sugar by weight, and use pressure-rated bottles (beer or champagne bottles).
Can you carbonate mead and keep it sweet?
Not safely with bottle conditioning. If you carbonate mead in bottles, yeast can keep fermenting sugars and build too much pressure. For sweet and sparkling, stabilize and backsweeten, then force carbonate in a keg and keep it cold.
Why is my carbonate mead pouring foamy or going flat?
Foam usually means the bottle is too warm, the mead is overcarbonated, or there’s sediment helping CO2 break out fast. Flat carbonate mead often needs more time, has a leaky seal, or was too cold during conditioning. With kegs, recheck your pressure, temperature, and contact time under gas.